The true test of a man's patience is crimping pins onto the end of a cable that leads to building a custom serial cable—especially if it's the first time you've even handled a serial cable in a decade. So as I searched under my desk, using my phone for a flashlight, I wondered whether I had finally found the IT project that would send me over the edge. On a recent day, I set out to turn my recently acquired vintage Radio Shack TRS-80 Model 100 computer into a working Internet terminal. And at this moment, I crawled on the floor looking for a DB-25 connector's little gold pin that I had dropped for the sixth—or maybe sixteenth—time.
Thankfully, I underestimated my patience/techno-masochism/insanity. Only a week later, I successfully logged in to Ars' editorial IRC channel from the Model 100. And seeing as this machine first saw the market in 1983, it took a substantial amount of help: a Raspberry Pi, a little bit of BASIC code, and a hidden file from the website of a certain Eric S. Raymond.
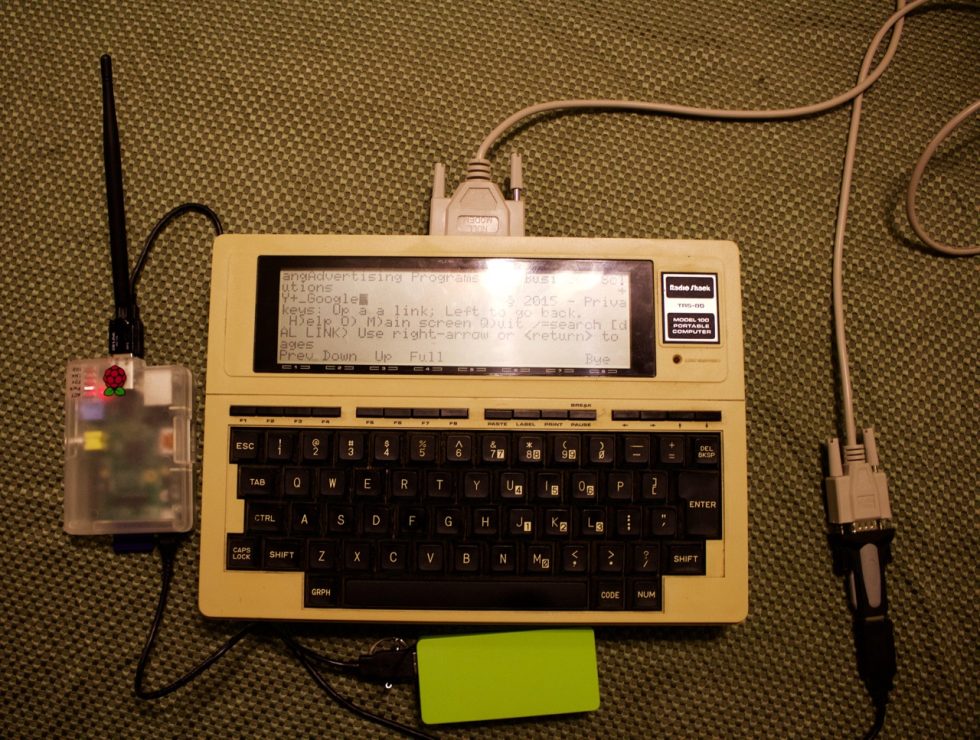
Meet the machine
In case you're not familiar with it or perhaps have confused it in some way with the slightly more famous TRS-80 desktop, the TRS-80 Model 100 (affectionately known among retro-computing buffs as the "T100") is the Radio Shack-branded version of an early "laptop" computer developed by Kyocera and Microsoft. It was the last system for which Bill Gates wrote a significant amount of code. As we reported in our initial hands-on tour of the Model 100, he considered it his favorite machine ever. (Sadly, Gates was unavailable to take this trip with us down memory lane.)
The machine has some nostalgic significance to me as well—I filed one of my first assignments as a technology journalist with a Model 100, connecting to MCI Mail over dial-up in a phone booth using acoustic couplers. At the time, the machine was a reporter's dream: 20 hours or more of life on four AA batteries plus built-in text editing, address book, calendar, and communications applications burned into an onboard ROM chip. It was easy to overlook the fact that even the top-end Model 100 only had 24 kilobytes of RAM. Literally any modern device surpasses that figure.
My current Model 100 came with a bit of a handicap; it didn't include the AC power supply, the original cables, or the cassette drive used to store and retrieve programs. The documentation was a photocopied, ring-bound duplicate for NEC's version of the same system, so there were a few minor but significant differences. And while many current Model 100 enthusiasts have upgraded the ROM of their systems to extend their capabilities, this one came with the stock ROM from 1984.
To date, I have a well-documented history of trying to drag 1980s technology into the 21st Century. I wasn't going to let a little thing like "no possible way of loading a TCP/IP stack" get in my way.
Step 1: Learning to communicate
The Model 100's built-in serial port is shared by a 25-pin DB-25 RS-232 jack and an internal modem. While the modem was tempting (a return to dial-up!), it can manage only 300 bits per second. The RS-232 connection can do up to 19,200 bits per second—a much more Internet-friendly speed, if the buffer and data bus on the Model 100 could keep up. All I needed was a null modem cable and a USB-to-Serial converter, then I could turn it into a serial terminal and run an Internet-connected shell session.
Based on the research I had done, it seemed like I would need to make my own null modem cable. While there are some pretty elaborate serial cables used to connect the Model 100 to PCs for file transfers using souped up ROMs and PC software, it looked like my best option (given my current lack of a soldering iron) was a three-wire connection that mirrored the one used for direct serial connections to the Raspberry Pi's pins.
So I ventured to the local electronics store to get a length of cable, male DB-25 and female DB-9 plugs, and the assorted odds and ends required to crimp the pins I needed. The cable worked in a serial test with an old PC laptop, so I went and put covers on the ends to make them look pretty. As it turned out, that wasn't a great idea. The DB-25 plug, covered, didn't fit into the narrow recess where the Model 100's serial output is concealed. I took the housing off the end and went back to the slapdash look.
-
Any day you have to go to the electronics supply store for work is a good day.
-
Everything I could possibly need, and a lot of things I hope I never do.
-
It looked a lot better with the cover, I swear.
Meanwhile, I found a source for a USB-to-serial adapter—Retrofloppy—while looking into how to get another venerable computer up and running again. Lo and behold, they had a null modem cable as well, intended for the Apple II Super Serial card. A few days later I had both in hand and successfully performed a serial communications test with my MacBook Air, using GoSerial from FurrySoft. This gave me a basic file transfer capability, but I wanted more.
This initial success with the MBA made me a bit foolhardy. I thought I could turn the Model 100 into a serial console for Mac OS X Yosemite. After all, it's Unix, right? Well, apparently not as much as it used to be—the configuration files for serial consoles in Yosemite appear to be mostly vestigial, and though there were some resources online that suggested I could pull it off, they were all several years old.
For sanity's sake, I set aside the MBA effort and returned to my original goal: the Raspberry Pi and Raspbian (the Debian Linux distribution built for the ARM-based system-on-card). I have a couple of the older Raspberry Pi Model systems, now made obsolete by the new Pi 2 Model B, so I decided that one of them would make a good companion to the even-more-obsolete Model 100.
Raspbian is, because of the nature of the Pi, set up by default to handle serial console sessions—but through the pins on its bus rather than through one of its two precious USB ports. It also is configured to connect serially, by default, at 115,200 bits per second. And there's another small (literally) problem: the screen of the Model 100 is only 40 columns wide and 8 lines high, and one of those lines is consumed by menu choices for its TELCOM terminal program.These issues are, mercifully, resolved with a few configuration changes to Raspbian's startup and terminal definition files. First, I needed a definition for the terminal configuration for the Model 100. Once upon a time, there was in fact a terminal configuration for the Model 100 in Linux's terminfo, but it was cast off into a "UFO" file around 1995. Guess what? Eric S. Raymond has a copy of that UFO file in a gzipped archive hidden in the recesses of his website, which I discovered by URL-hacking my way from a link to his old site from Brian "Danger" Hicks' page, "The Model 100 Serial Terminal Project." Here's the relevant bit:
 trs100|Radio Shack Model 100:\
 :am:bs:xt:\
 :co#40:li#8:\
 :al=\EL:bl=^G:cd=\EJ:ce=\EK:cl=\EE:cm=\EY%+ %+ :\
 :cr=^M:dl=\EM:do=^J:ho=\EH:kb=^H:kd=^_:kl=^]:kr=^\:\
 :ku=^^:le=^H:nd=34:se=\Eq:sf=^J:so=\Ep:up=\EA:\
 :ve=\EP:vi=\EQ
I put that into a text file on the Raspberry Pi called model100 and then used it to recompile Raspbian's terminal information library:
tic model100
Bam! I had a terminal config called "trs100" to reference.
On the Model 100's side, I needed to configure the TELCOM application to communicate with that serial console session. TELCOM uses a set-up command, "Stat," to configure the speed and communications settings for a terminal session. Stat configures the connection based on a five-character string that uses single characters to define:
- The baud rate (1 = 75, 2 = 110, 3 = 300, 4 = 600, 5 = 1200, 6 = 2400, 7 = 4800, 8 = 9600, 9 = 19200);
- The size of the bit words of data sent over the connection (7 or 8 bit);
- The parity bit used for error checking (E for even, O for odd, N for none, I for ignore);
- The number of stop bits (1 or 2);
- And whether XON/XOFF is enabled (E) or disabled (D).
So, for example, to configure TELCOM on the Model 100 for my goal speed of 19,200 baud, using 8 bit words, no parity, 1 stop bit, and disabled XON/XOFF, the setup string would be:
Stat 98N1D
Next, I needed to configure Raspbian to open up a serial console connection to the USB-to-serial adapter at startup. Console sessions are configured in the /etc/inittab file in Raspbian, like most Linux distributions, which launches processes during startup. The part of inittab I was interested in looks like this:
#Spawn a getty on Raspberry Pi serial line
 T0:23:respawn:/sbin/getty -L ttyAMA0 115200 vt100
I wanted to add an instance of getty, the program in most *nixes that runs terminal console sessions, that connected to the USB serial adapter with a speed and definition that the Model 100 could handle. The device ID for the serial-to-USB adapter was USB0, and I was going for 19,200 for my connection, so I added:
T1:23:respawn:/sbin/getty -L ttyUSB0 19200 trs100
Then I saved and restarted. At first blush, it seemed to be working flawlessly.
reader comments
130